
If you're still using AI models like Gemini, Claude, or ChatGPT in your web browser, you're working with one hand tied behind your back. It's the slow, messy, and inefficient way to get things done. There's a powerful secret that AI companies market to developers but rarely talk about to the rest of us: the command line interface, or CLI.
Working with AI in the terminal isn't just for coders; it's a superpower for anyone who writes, researches, or manages projects. Once you experience the speed, control, and clarity of a terminal-based workflow, you'll never want to go back to the browser. Let's dive in and unlock your new AI superpower.
Tired of 20 Browser Tabs? Why Your AI Needs to Live in the Terminal
Before we jump into the setup, let's talk about the problem. Does this frantic, disorganized workflow sound familiar? For a deeper dive into the advantages, read Terminal vs. Browser: Why Command-Line AI is a Game Changer.
The Problem: Lost Context and Endless Copy-Pasting
You start a research project in a browser chat window. You're asking questions, diving deep, and soon the scrollbar is a tiny speck. This is your fifth chat with the same AI because it keeps losing context. To double-check the facts, you have parallel chats going with two other AI models. You try to consolidate your findings by copying and pasting snippets into a separate notes app, but it quickly becomes an unmanageable mess.
Your brilliant project is now scattered across twenty browser tabs, multiple AI services, and a patchwork of disorganized notes. There is a better way.
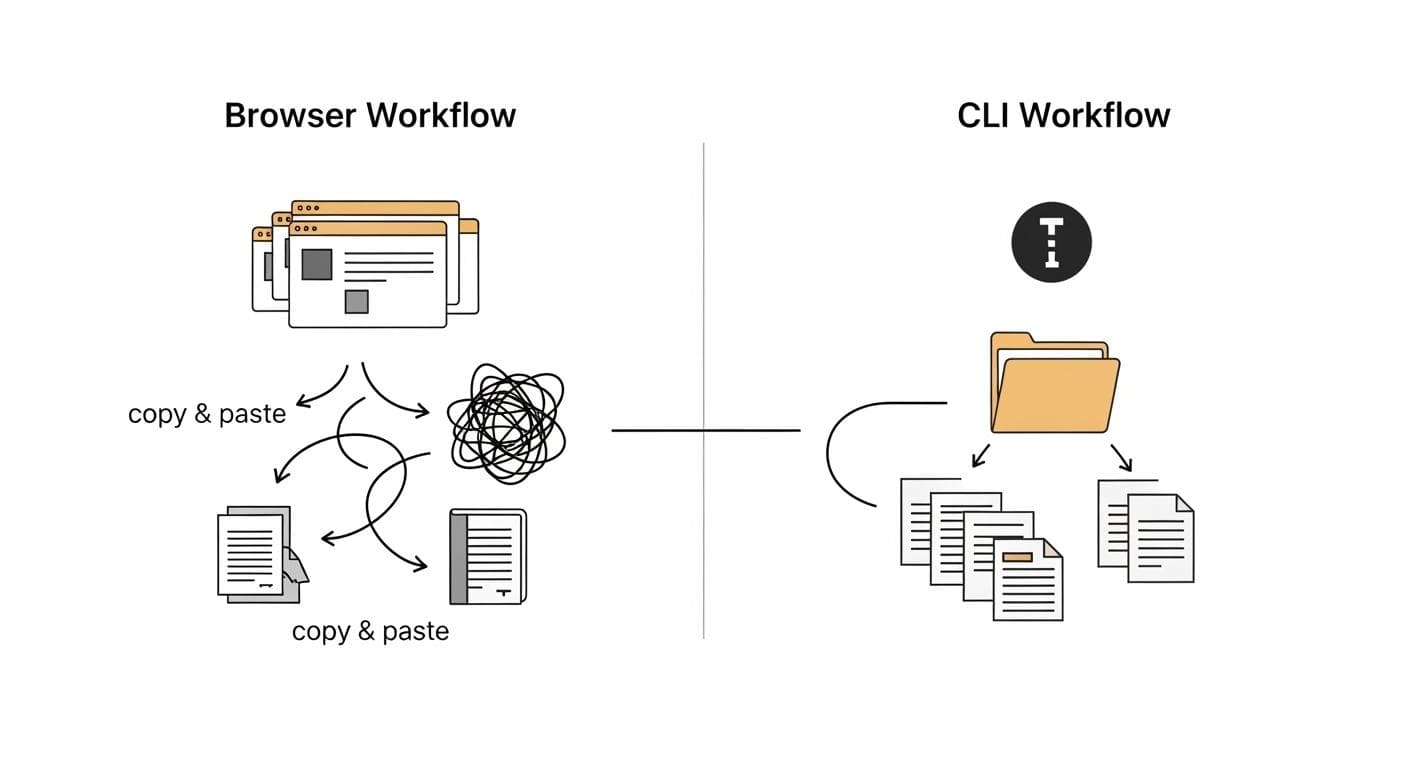
The Solution: A Faster, Smarter Workflow You Control
Imagine a single, focused window where your conversation with the AI is clear and persistent. Imagine an AI that can read your project files directly and write new documents for you, no copy-pasting required. Imagine closing your computer, coming back tomorrow, and having the AI pick up exactly where you left off, with full memory of the entire project.
This isn't a futuristic dream; it's what happens when you move your AI workflow to the terminal. You gain control over your data, your context, and your productivity.
Installation Made Simple (No Coding Experience Required)
Ready to try it? We're going to start with the Google Gemini CLI because it's powerful, easy to install, and has a generous free tier that anyone with a Google account can use.
Step 1: Open Your Terminal (Yes, You Have One!)
The terminal, also known as the command line, can feel intimidating, but it's just a text-based way to interact with your computer. Every major operating system has one built-in.
- For Windows Users: You have a couple of great options. The recommended path is using the Windows Subsystem for Linux (WSL). It provides a consistent Linux environment that many modern tools are built for. To set it up, open PowerShell as an administrator and run
wsl --install, then open the 'Ubuntu' app. Alternatively, the standard 'Terminal' or 'Command Prompt' will work perfectly fine. - For Mac Users: Open the 'Terminal' app. You can find it in your Applications folder inside the Utilities folder, or just search for 'Terminal' using Spotlight (Cmd + Space).
Step 2: The One Command to Install Gemini
Before you install the Gemini CLI, you need a tool called Node.js and its Node Package Manager (npm). If you don't have it, download the latest 'LTS' version from the official Node.js website.
Once npm is ready, type or paste the following command into your terminal and press Enter:
npm install -g @google/gemini-cli
This command tells npm to (install) globally (-g) the Gemini CLI package. You might be prompted for your password. If you see any permission errors, try running the command with sudo at the beginning (for Mac/Linux): sudo npm install -g @google/gemini-cli.
Step 3: Connecting Your Google Account
Now that it's installed, let's get it connected. Type gemini into your terminal and press Enter. The first time you run it, it will prompt you to log in. It will likely open a new tab in your web browser, asking you to sign in with your Google account and grant permission. Once you do, you're logged in and ready to go!
Your First Project: Let's Plan the Perfect Weekend Getaway
To see the power of the Gemini CLI, let's walk through a simple, practical project that doesn't involve any code: planning a trip.
Step 1: Making a Home for Your Project (Creating a Folder)
Organization is key. The CLI works directly with your computer's file system. Let's create a dedicated folder for our project. In your terminal, type the following commands, pressing Enter after each one:
mkdir weekend-getaway(This command 'makes a directory' named 'weekend-getaway')cd weekend-getaway(This command 'changes directory' to move you inside the new folder)
Step 2: Your First Conversation with Gemini CLI
Now that you are inside your project folder, type gemini and press Enter to start a chat session. The interface is clean and simple. Go ahead and ask it something:
I want to plan a 3-day weekend getaway for two from San Francisco in mid-October. We love hiking and good food, but want to avoid huge crowds. Budget is around $800. Give me three distinct destination ideas.
Gemini will process your request, maybe showing fun status messages like 'herding digital cats,' and then provide a detailed response, just like in the browser. But this is where the magic begins.
Step 3: The Magic Trick: Asking Gemini to Create a File for You
Your browser can't do this. Let's say you like the 'Mendocino Coast' idea. Give Gemini this follow-up prompt:
The Mendocino Coast idea sounds great. Research the top 5 moderate hiking trails in that area and create a detailed itinerary for the 3-day trip. Put the final itinerary into a file named 'mendocino-itinerary.md'.
Gemini will ask for your permission to write a file to your computer. Type y for yes and hit Enter. Just like that, a new file named mendocino-itinerary.md appears in your weekend-getaway folder. You didn't have to copy and paste anything. The AI did the work for you, directly on your computer.

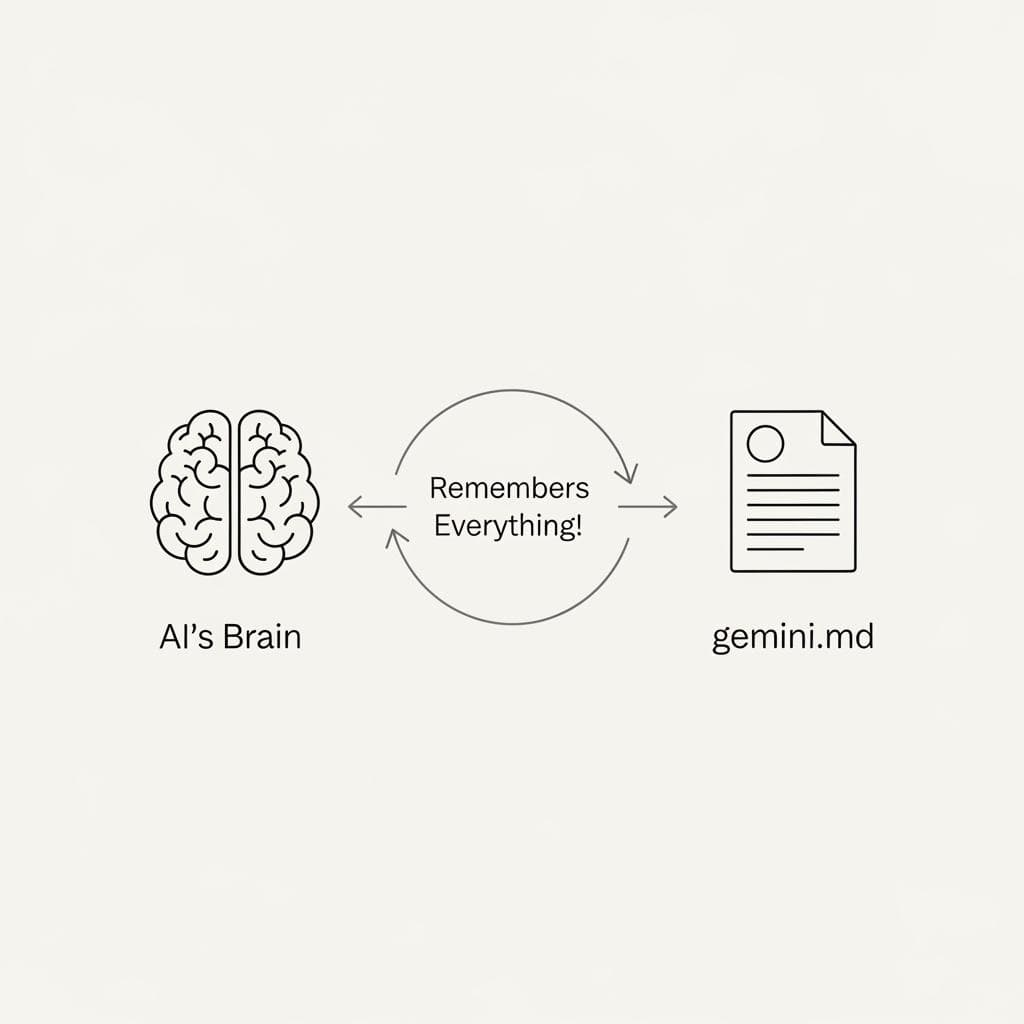
The "Aha!" Moment: Understanding Your AI's New Brain (The gemini.md File)
Interacting with your file system is a superpower, but it's only half the story. The real game-changer is how the Gemini CLI handles memory and context.
What is a Context File? (And Why It's a Game-Changer)
In a browser, the AI's memory of your conversation is temporary and locked away on a server. When you start a new chat, it knows nothing about your previous one. The CLI solves this with a context file—a simple text file that acts as the AI's permanent brain for your project.
How to Create It with One Simple Command: /init
Inside your Gemini chat session, type the command /init and press Enter.
Gemini will analyze your project—the files in the folder, the conversation you've had so far—and create a new file named gemini.md. This file contains a summary of the project, its goals, and key information. It's a set of instructions the AI will read every single time you start a session in this folder.
Testing the Magic: Close and Re-Open Gemini (It Remembers Everything!)
Type /exit to close your Gemini session. Now, type gemini again to start a brand new one. Notice that it tells you it's loading the gemini.md file. The context window is fresh at 100%, but the AI is not a blank slate. It has read its brain.
Now, give it a simple prompt with no background information:
Suggest three highly-rated restaurants near the hiking trails in our itinerary.
Without needing any reminders, it knows exactly what itinerary you're talking about. It understands the project's context instantly. No more re-explaining, no more starting over, no more 20 scattered chats. Your entire project lives in one folder, organized and intelligent.

Frequently Asked Questions (FAQ)
- Is Gemini CLI free to use? Yes, the Gemini CLI has a generous free tier. The Gemini 1.5 Flash model is free (subject to limits), and you get a free quota for the more powerful Gemini 1.5 Pro model as well. For most personal projects, the free tier is more than enough.
- Is this safe? Can the AI access all my computer files? The AI only has access to the folder you launch it from. It cannot read or write files outside of that specific project directory unless you explicitly give it instructions and permissions to do so. Furthermore, it will always ask for your confirmation before writing or modifying a file. For a comprehensive understanding of securing your command-line AI, explore Local AI Security: Mitigating Risks When Using Terminal-Based Tools.
- What if the installation gives me an error?
The most common error is a permissions issue. Try running the installation command with
sudo(for Mac/Linux) at the beginning. Another common issue is not having Node.js and npm installed. Ensure you've installed the latest LTS version from the official Node.js website.
By moving your AI workflow from the chaos of the browser to the calm control of the terminal, you're not just changing tools—you're fundamentally upgrading how you think and create. You own your data, you control the context, and you unlock a level of productivity you never thought possible. This is your AI, on your terms. While this guide focuses on Gemini, the principles apply to other terminal AI tools, and many users appreciate open-source options like Open Code, an all-in-one open-source AI terminal.
What's the first project you're going to tackle now that you have these terminal superpowers? Share your ideas in the comments below!


Comments
We load comments on demand to keep the page fast.