
If you're still using AI in a browser for serious work, you're operating with one hand tied behind your back. For every complex project-whether you're a writer, researcher, or developer-the web UI inevitably becomes a frustrating bottleneck. Major AI companies have quietly released powerful terminal-based versions of their models, often marketing them narrowly to coders. But here's the secret they aren't shouting: these tools are for everyone, and they are vastly superior to their browser counterparts for everything.
Working with AI in the terminal isn't just a different interface; it's a new paradigm. It's a superpower that transforms your workflow from a scattered, forgetful mess into a streamlined, intelligent process. Once you experience the control and efficiency of a command-line interface (CLI) for AI, you'll never return to the browser's limitations.
The Browser Is a Cage: Why Your Current AI Workflow Is Broken
Does this scenario feel painfully familiar? You're deep into a research project. Your browser tab is on its fifth endless chat session because the AI has, once again, forgotten the entire history of your conversation. You've spun up parallel chats with two other AI models just to cross-reference facts. You're frantically copy-pasting key insights into a separate notes app, praying they don't get lost in the digital ether. At the end of the day, your project isn't a cohesive body of work; it's a digital explosion site, fragmented across dozens of chats and disconnected files. This chaos is the inherent flaw of the browser-based model.
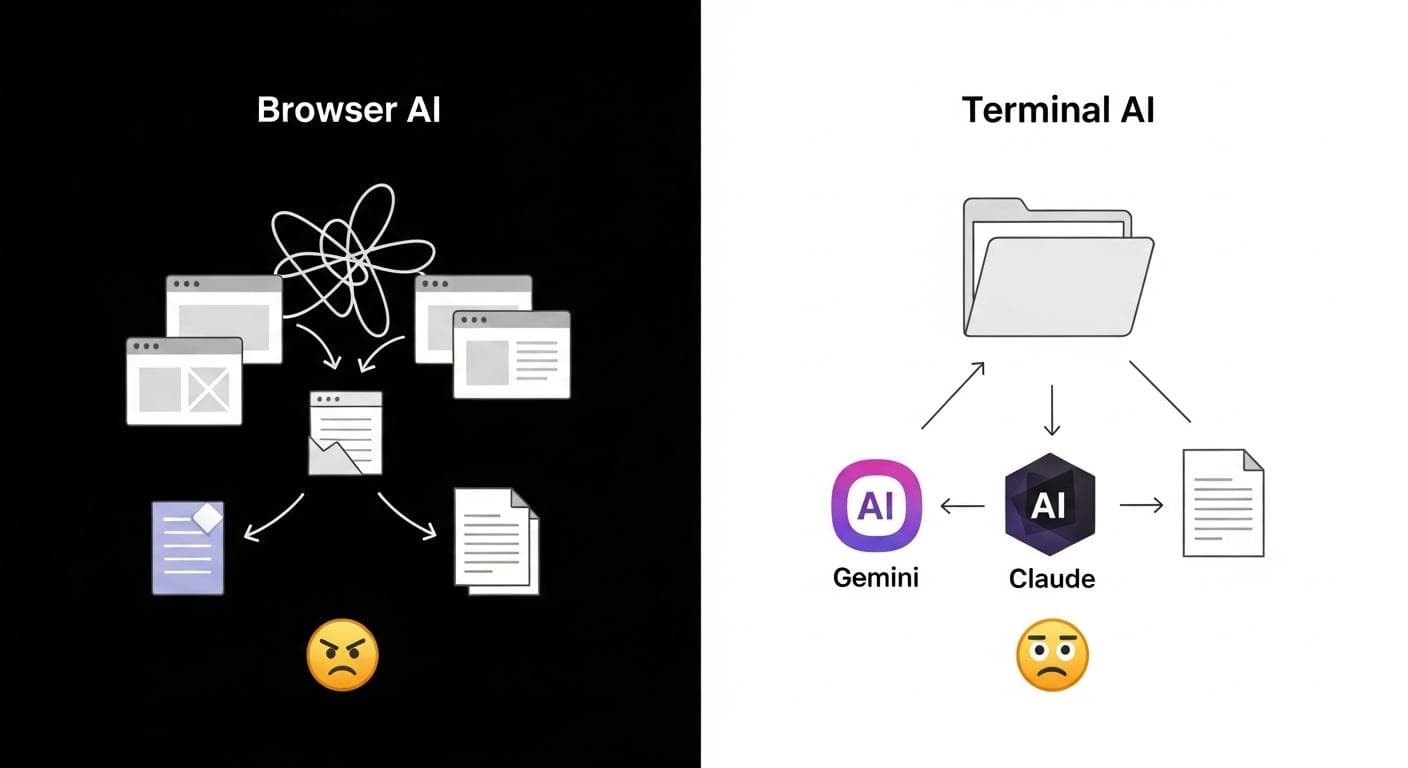
The Illusion of "Chats": Scattered, Siloed, and Forgetful
Browser AIs treat each conversation as a disposable, isolated chat. There's no persistent memory between sessions. Every time you start a new conversation, you must painstakingly re-explain your project's entire context: the goals, the constraints, the key files, the previous decisions. This constant re-education is a massive tax on your time and creative momentum.
The Pain of Constant Copy-Pasting
The browser acts as a wall between the AI and your actual work. You're forced into a tedious cycle of copying prompts from your documents, pasting them into a chat window, and then copying the AI's response back into your project. This manual, error-prone process ensures that crucial context is inevitably lost in translation.
Vendor Lock-In: Your Project Intelligence Isn't Truly Yours
When your entire project history is trapped within the chat logs of a specific service like ChatGPT, you become a captive customer. All the intelligence-the refined prompts, the iterative development of your ideas-lives on their servers, not on your hard drive. If a better, more powerful AI model comes along, migrating your project is nearly impossible. You're forced to start from zero.
The Terminal Is Your Workshop: A New Paradigm for AI
The terminal, or command-line interface (CLI), breaks the AI out of the browser's cage and integrates it directly into your local file system. This isn't just a minor improvement; it's a fundamental shift in power that puts you back in the driver's seat.
What is Terminal AI? (And Why It's Not Just for Coders)
Terminal AI refers to tools that let you interact with large language models (LLMs) from your computer's command line. While the terminal has been a developer's domain, these new tools are designed for everyone. The core interaction is the same: you write a prompt and get a response. The difference is where that interaction happens-right alongside your project files.
The Superpower: Reading and Writing Local Files
This is the single most transformative feature. Instead of copy-pasting, you can issue direct commands: "Read the draft in my-article.md, provide feedback based on the research in the sources folder, and write your suggestions into a new file named revisions.md." The AI operates directly on your files, acting as a true digital assistant embedded in your workspace.

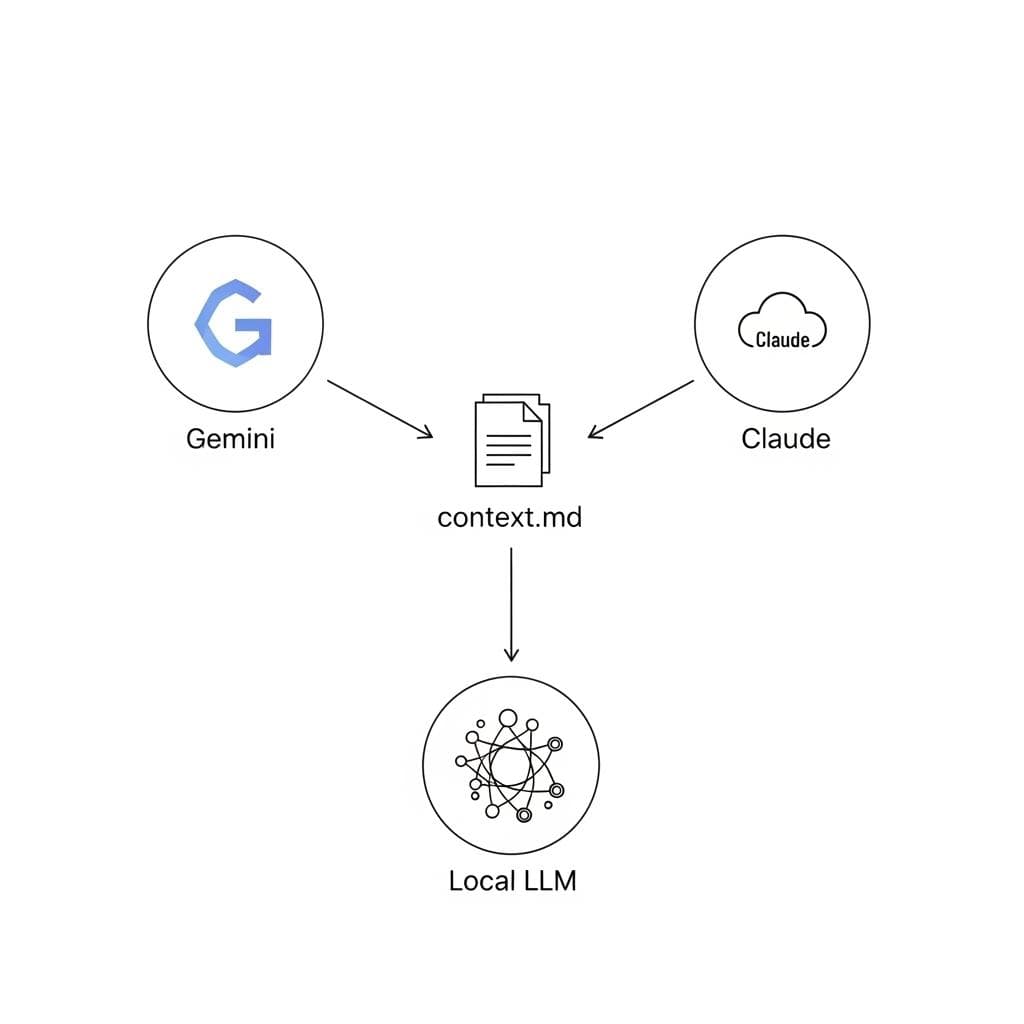
The "Context File": Your Project's Single Source of Truth
The breakthrough concept is the context file. These are simple Markdown files you create within your project directory, named according to the tool's convention (e.g., claude.md, GEMINI.md). This file acts as the project's persistent brain.
You fill it with the high-level context: project goals, key stakeholders, tone of voice, and pointers to important files. Every time you launch the AI in that directory, it first reads this file, instantly understanding the entire project without you re-explaining anything. As you work, you can instruct the AI to update this file with new progress. This file is the key to owning your context-it's a plain text file, versionable, and entirely yours.
Getting Started: Your AI Toolkit
Diving into the terminal is easier than you think. Here are three powerful tools to get you started on Mac, Windows (with WSL), or Linux.
Tool 1: Google's Gemini CLI (The Generous Free Tier)
Gemini CLI is the perfect entry point thanks to a generous free tier that gives you access to the powerful Gemini 1.5 Pro model.
- Installation: Open your terminal and run
npm install -g @google/gemini-cli. - Project Setup: Create a project folder:
mkdir my-ai-project && cd my-ai-project. - Create Context File: Inside the folder, create a file named
GEMINI.md. In this file, write down the core context for your project (e.g., "This project is about writing a blog post on the history of coffee."). - Launch: Type
geminiin the terminal. It will prompt you to log in with your Google account. It will automatically read your `GEMINI.md` file and be ready to work.
Tool 2: Anthropic's Claude Code (The Power User's Choice)
Claude Code is a feature-rich powerhouse. A single Claude Pro subscription ($20/month) fully unlocks its terminal use-no complex API keys needed. Its strength lies in its ability to handle complex, multi-step tasks and be shaped into different "personas" for your project.
Instead of a rigid, built-in feature, you can define these personas in your claude.md context file. For example, you can create a section titled ## Persona: Brutal Critic and describe how you want it to act: "You are a skeptical editor. Your goal is to find weaknesses in arguments and suggest improvements. Be direct and concise." When you need that persona, you can prompt Claude: "Acting as the Brutal Critic, review my draft in chapter1.md."
Tool 3: Open Code & The Power of Local Models
For ultimate control and privacy, you can run open-source LLMs directly on your own machine using a tool like Ollama. This means your data never leaves your computer. A tool like Open Code can then act as a user-friendly interface for these local models.
- Install Ollama: Download and install Ollama from their website.
- Run a Model: Open your terminal and run a command like
ollama run llama3to download and start using the powerful Llama 3 model. - Connect with Open Code: Install Open Code and configure it to connect to your local Ollama instance. You now have a private, powerful AI running entirely on your own hardware.
The Ultimate Workflow: Orchestrating Multiple AIs
Because your project context lives in local files, you can leverage the unique strengths of different models on the same project, at the same time.
A Practical Example: From Research to Draft
Imagine a researcher writing a paper on remote work. They open three terminal windows in the same project folder.
- Terminal 1 (Gemini for Research): They prompt Gemini,
"Find the top 5 academic papers from the last 2 years on remote work's impact on commercial real estate. Summarize each and save the results to 'sources_summary.md'." - Terminal 2 (Claude for Writing): After reviewing the summary, they switch to Claude.
"Read 'sources_summary.md' and my project outline in 'paper_outline.md'. Write a 500-word literature review and save it as 'lit_review_draft.md'." - Terminal 3 (Local Llama 3 for Critique): For a private, unbiased review, they use their local model.
"Read 'lit_review_draft.md'. Identify any weak arguments or areas that need more supporting evidence. Act as a skeptical peer reviewer."

Level Up: Managing Your Context with Git
For the ultimate power move, treat your context files (claude.md, etc.) like code. Initialize a Git repository in your project folder (git init). After a productive session, commit the changes to your context file: git commit -am "Updated project status after finishing literature review". This gives you a complete version history of your project's "brain," allowing you to go back in time or experiment with different prompting strategies without fear of losing your core context.
Security in the Terminal: Giving AI the Keys (Safely)
Granting an AI access to your file system is a significant step. It requires handling this powerful tool with respect and clear safety protocols.
Understanding the Risks
When you allow a terminal AI to write files, you are executing code influenced by a remote service. While leading tools have safeguards, a compromised tool or a malicious prompt could theoretically lead to unintended file deletion or modification.
Best Practices for Sandboxing and Permissions
Adopt a mindset of "zero trust." Don't run AI tools in directories containing sensitive data.
- Dedicated Project Folders: Always create specific, isolated folders for each AI project. Only place relevant files inside.
- Review Permissions: Tools like Claude Code are security-conscious and will ask for permission before writing files or executing commands. Read these prompts carefully. You can pre-approve certain safe tools using configuration files to streamline your workflow without sacrificing safety.
- Use Version Control: Keeping your project in a Git repository is your ultimate safety net. If an AI makes an undesirable change, you can instantly revert the files to their previous state.

You Are Now in Control
By moving your AI workflow from the browser to the terminal, you fundamentally change your relationship with this technology. You transition from a passive user of a siloed web app to an active operator of a powerful, integrated tool.
Your project's intelligence is no longer trapped on a vendor's server; it lives in a folder on your hard drive, structured in plain text files that you own, control, and can take with you to any new AI that comes along. This is the future of professional, AI-powered work. It's local, it's powerful, and it's yours.
What is the first project you plan to tackle with a terminal AI workflow, and which tool are you most excited to try first? Share your thoughts in the comments below.


Comments
We load comments on demand to keep the page fast.