
If you're still using AI exclusively through a web browser, you're operating at a fraction of your potential. While AI companies market their slick web interfaces, they've quietly built powerful command-line versions of their tools aimed at developers. But here's the secret: they aren't just for coding. They are for everything, and they are phenomenally better.
Working with AI in the terminal is a superpower that transforms your workflow for writing, research, and complex project management. Once you experience the control and efficiency of a terminal-based AI, you'll never want to go back to the chaotic world of browser tabs.
Tired of Browser AI Chaos? There's a Better Way.
The modern knowledge worker's digital life is often a frantic, disorganized scramble. This is especially true when using AI for complex projects. Let's be honest: does this scenario sound familiar?
The Frustration: 20 Tabs, Lost Context, and Scattered Notes
You're deep into a research project, your browser is groaning under the weight of 20 open tabs, and you're on your fifth separate chat with an AI model because it keeps losing the context of your conversation. You've tried to copy and paste snippets into a notes app, but that system collapsed hours ago. Your project is now a disorganized mess, scattered across a digital wasteland of chats and half-formed ideas. This isn't an efficient workflow; it's digital entropy.
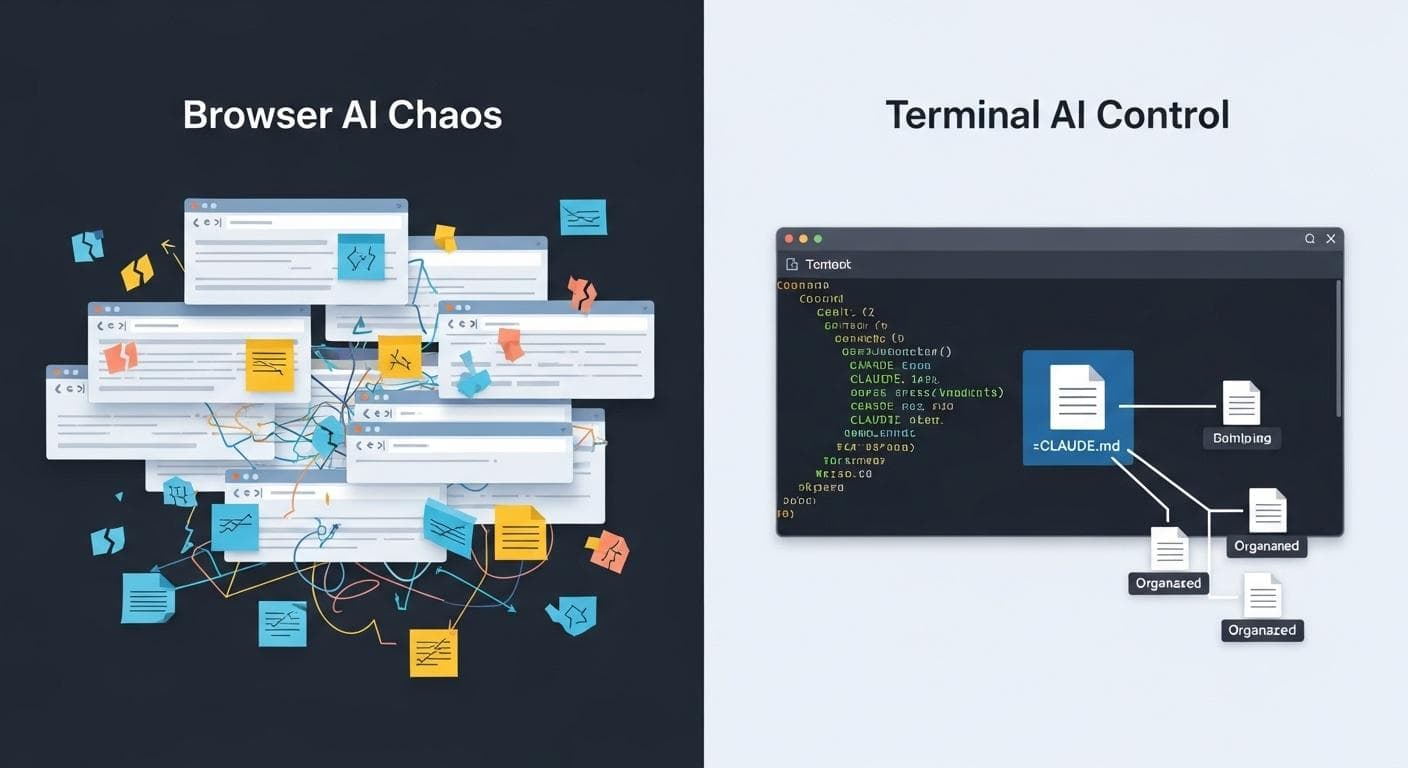
The Solution: Taking Back Control with Terminal-Based AI
The terminal offers a revolutionary alternative. Instead of your project living in a cloud-based chat log you don't control, it lives in a folder on your computer. The AI comes to your workspace. This simple shift puts you back in the driver's seat. Your context, your files, and your project history are yours to own and manage. It's a move from renting a temporary workspace to owning the entire building. To learn more about this fundamental difference, dive into the specifics of why command-line AI is a game changer. For a deeper understanding of this control, explore how terminal AI puts you in control of your data.
What is Claude Code and Why Are "Agents" a Game-Changer?
While several terminal AI tools exist, Anthropic's Claude Code stands out because of one transformative feature: Agents. This isn't just about chatting with an AI in a different window; it's about building a team of specialized AI assistants that can work for you, independently and simultaneously.
Beyond a Chatbot: An AI Partner with Access to Your Files
At its core, Claude Code is a command-line interface (CLI) that gives a powerful AI model like Claude 3 Sonnet direct access to your local file system. This breaks the AI out of the browser's sandbox. It can read your notes, analyze spreadsheets, write documents directly into your project folder, and even execute scripts. It becomes a true digital partner, deeply integrated into your actual work environment.
The Core Concept: Delegating Tasks to Specialized Sub-Agents
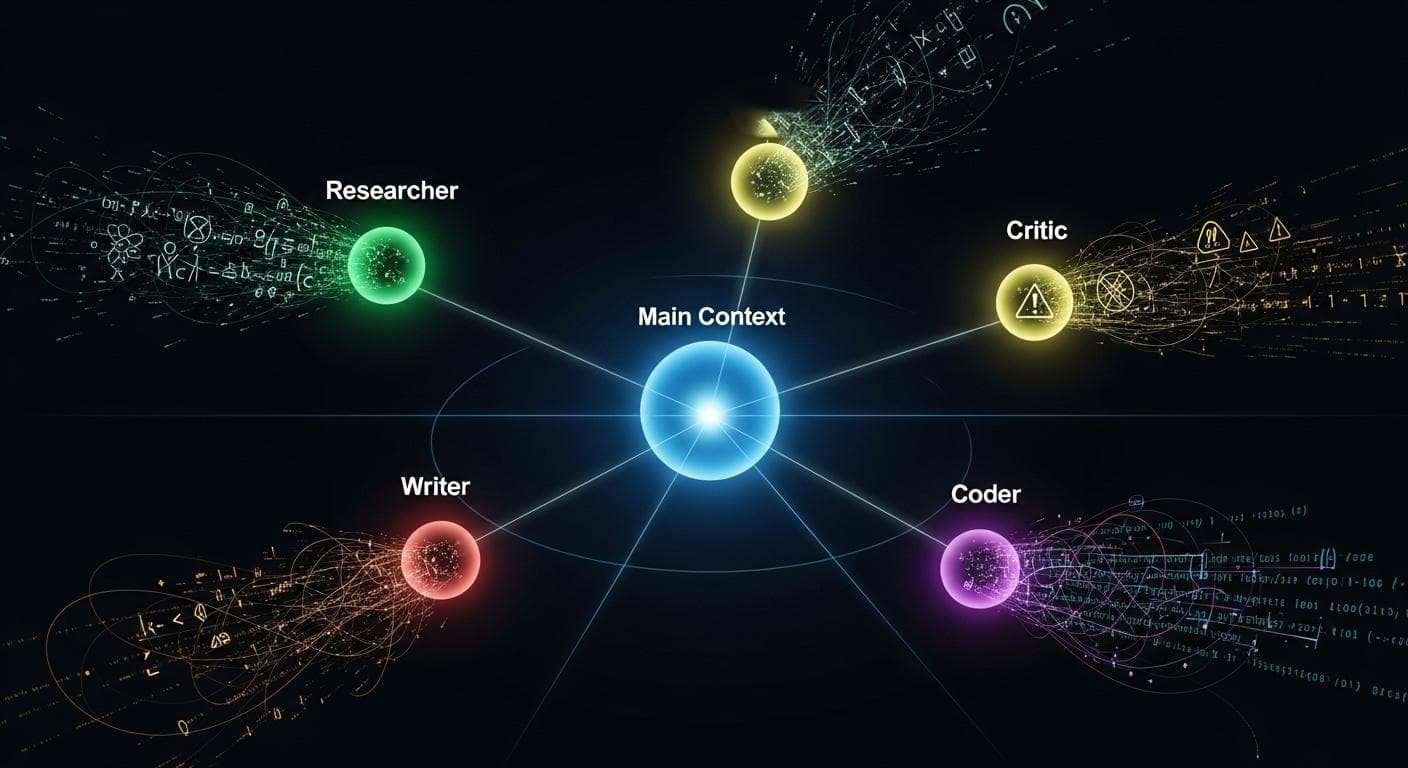
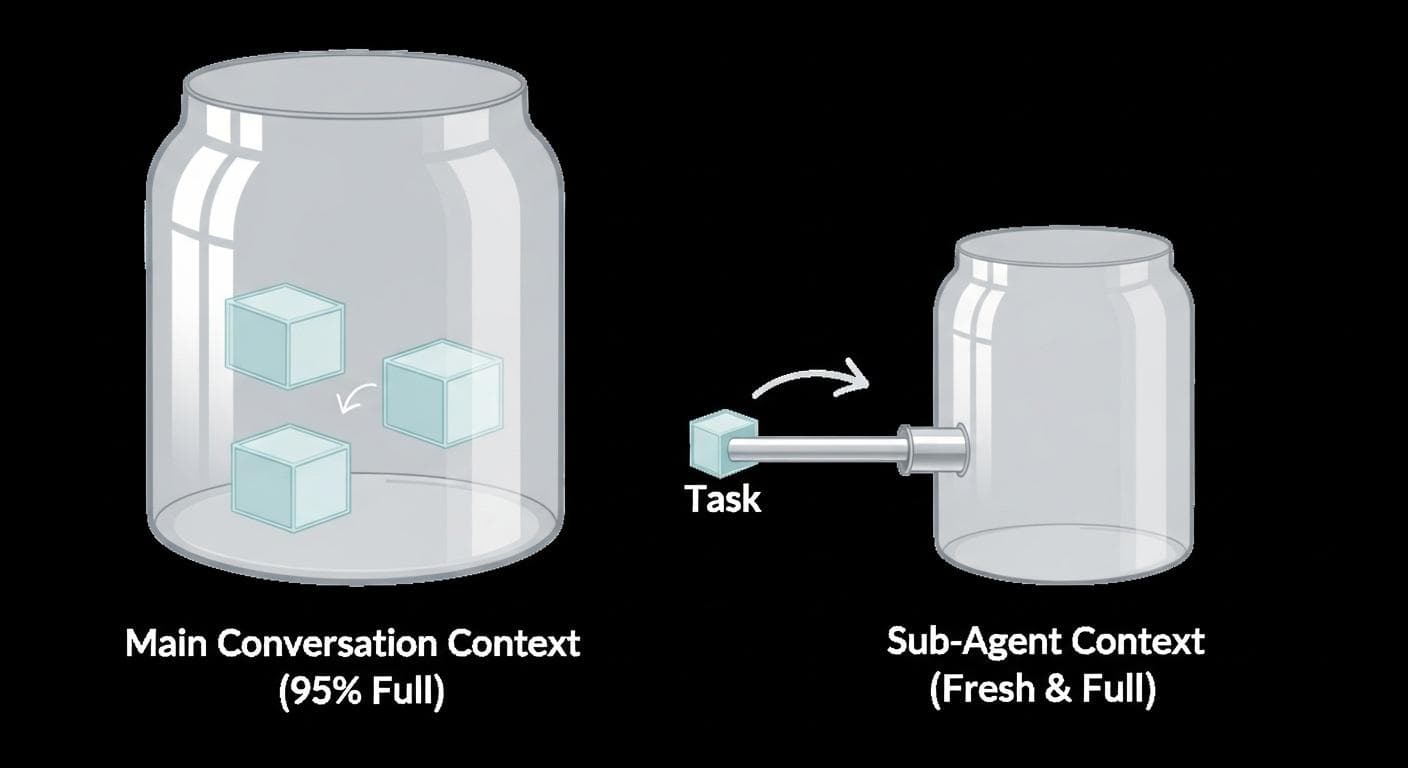
The real magic begins with agents. An agent is a separate, specialized instance of Claude with its own instructions, purpose, and-critically-its own fresh context window. Instead of bloating your main conversation with every single task, you can delegate. Need to research a complex topic? Deploy your "Research Guru" agent. Need a harsh critique of your draft? Unleash your "Brutal Critic" agent. The main AI acts as a project manager, dispatching tasks to its team of specialists, leaving your primary conversation clean and focused on high-level strategy.
Getting Started: Your First 10 Minutes with Claude Code
Diving into the terminal might seem intimidating, but getting started with Claude Code is surprisingly straightforward. If you can copy and paste a command, you can do this.
A Quick Terminal Primer for Newcomers
If you're new to the command line, you only need to know three basic commands to get started:
- `mkdir project-name`: Makes a new directory (folder) called `project-name`.
- `cd project-name`: Changes directory, moving you inside the `project-name` folder.
- `ls`: Lists all files and folders in your current directory.
That's it! With these, you can navigate your file system and set up your projects.
Installation and Logging In (With Your Pro Subscription)
The good news is that if you already have a Claude Pro subscription (around $20/month), you have access to Claude Code. You don't need to mess with complex API keys and pay-per-use billing. Installation is typically a single command:
npm install -g @anthropic-ai/claude-code
Once installed, navigate to your project folder in the terminal and simply type claude. It will prompt you to log in via your browser, and just like that, you're connected.
Initializing Your Project: The Power of claude init and CLAUDE.md
To unlock the power of terminal AI, navigate to your project directory and run the most crucial command: /init. Claude will analyze the files and folders in your current directory and create a file named CLAUDE.md.
The Anatomy of CLAUDE.md
This markdown file is the persistent brain of your project. It's a simple text file where Claude stores essential context. Every time you start Claude in that folder, it reads CLAUDE.md first. This means it instantly knows what you're working on without you having to explain it again. A typical file might look like this:
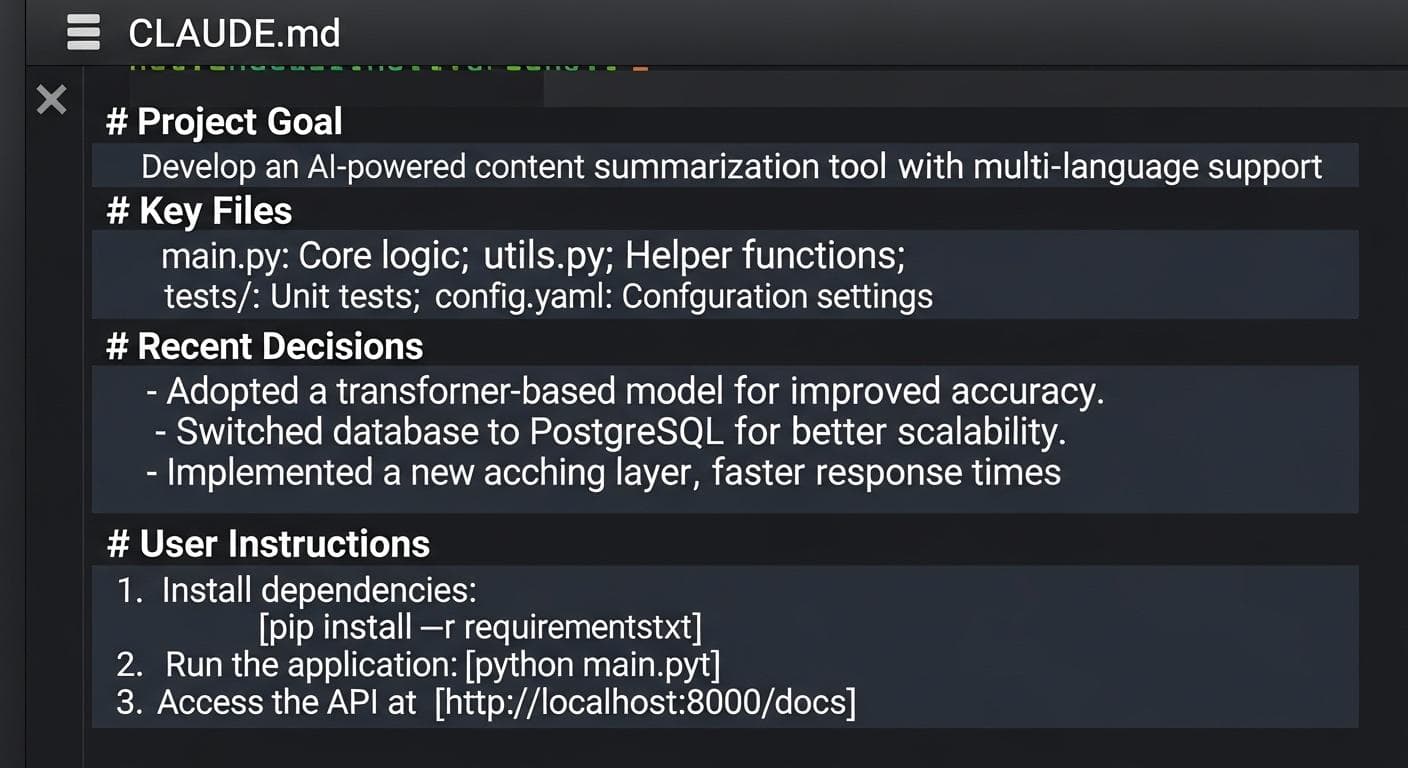
Best of all, you can manually edit this file. If the AI is misunderstanding something, you can open CLAUDE.md and clarify your instructions, giving you an unparalleled level of control. This directly contributes to owning your AI context.
Mastering Agents: From a Single Assistant to an AI Team
Once you've grasped the core concept of a persistent context file, you're ready to build your AI team.
Creating Your First Agent: The /agents Command Explained
Creating an agent is done through a simple menu. Just type /agents in the Claude Code interface. You'll be prompted to create a new agent, give it a name (e.g., "Home Lab Guru"), and provide its core instructions.
Project vs. Personal Agents: When to Use Each
Claude Code offers a brilliant distinction:
- Project Agents: These agents are tied specifically to the project folder you are in. A "Video Script Critic" agent would live only within your video production project.
- Personal Agents: These are global agents available to you in any project. A "Session Summarizer" agent that cleans up and commits your work to a code repository is a perfect candidate for a personal agent you can call on anywhere.
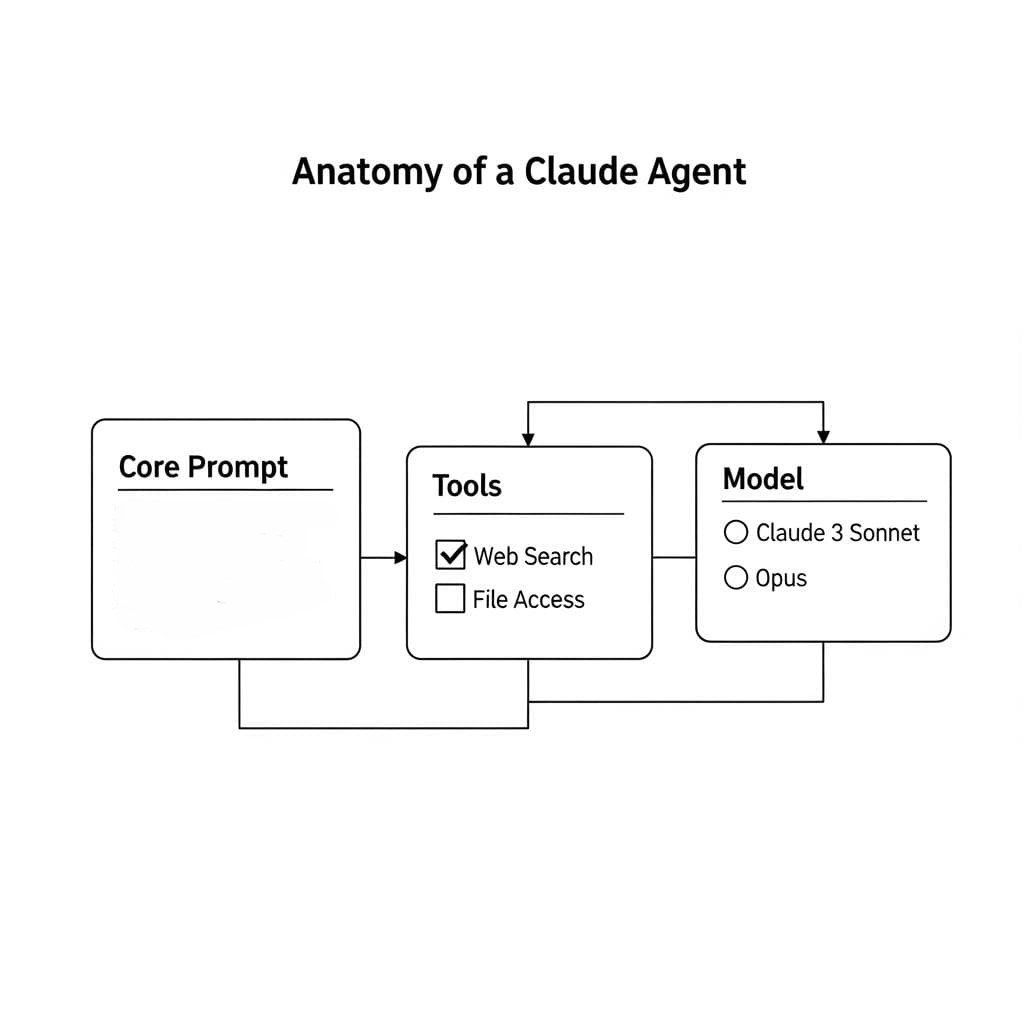
The Anatomy of an Agent: Prompts, Tools, and Model Selection
Each agent you create is defined by a few key components:
- The Prompt: This is the agent's constitution. It's where you define its persona, its goals, and its rules. For a "Brutal Critic," you might write, "You are an unsparing editor. Your goal is to find every weakness in this document. Do not be encouraging. Be ruthless and precise."
- Tools: You decide what capabilities an agent has. You can grant it access to the web for research, allow it to read and write files, or restrict it completely for purely analytical tasks.
- Model: You can assign different AI models to different agents. Your standard Claude Pro plan gives you access to the highly capable Claude 3 Sonnet model for all your agents. For users on higher-tier plans or using API credits, you can assign the more powerful Claude 3 Opus to specialized, heavy-lifting tasks.
The Power User's Playbook: Real-World Agentic Workflows
Here's how you can assemble specialized AI teams for different professional needs, moving beyond simple Q&A to sophisticated, automated workflows.

For Developers: The "Test-Driven Development" Agent Team
Imagine a team dedicated to writing robust code.
- The Architect: A high-level agent that helps you design the overall structure of your application based on your requirements.
- The Test Writer: An agent whose sole job is to read your code specifications and write comprehensive unit tests before you even write the implementation.
- The Coder: An agent that takes the specifications and the tests and writes the code to make the tests pass.
- The Refactorer: A fourth agent that reviews the working code for clarity, efficiency, and adherence to best practices.
For Writers: The "Researcher," "Draftsman," and "Brutal Critic" Trio
This is a classic workflow for creating high-quality content.
- The Researcher: You deploy this agent with web access to gather sources, statistics, and supporting evidence for your article, compiling it all into a `research_notes.md` file.
- The Draftsman: This agent reads the research notes and your outline, then generates a first draft of the content, focusing on structure and flow.
- The Brutal Critic: Once the draft is complete, you deploy this agent to tear it apart. It checks for logical fallacies, weak arguments, and passive voice, providing actionable, unsentimental feedback.
For Project Managers: The "Summarizer" and "Next Actions" Agent
Manage project communications and planning with ease.
- The Summarizer: Point this agent to a folder of meeting transcripts or a long email thread. Its job is to read everything and produce a concise summary with key decisions and takeaways.
- The Next Actions Agent: This agent takes the summary and generates a formatted list of action items, assigning them to team members and suggesting deadlines, ready to be pasted into your project management tool.
Advanced Tactics: Orchestrating Multiple Agents
Mastering agents is about more than just creating them; it's about knowing how to orchestrate them effectively.
Protecting Your Main Context Window by Offloading Tasks
The single most important benefit of using sub-agents is context window protection. Every AI model has a limited amount of information it can remember at one time (its "context window"). When you ask the main Claude instance to perform a huge research task, it fills up its context window. By delegating that task to a sub-agent, the main conversation's context remains lean and focused. The sub-agent gets its own full, fresh context window to work with, does its job, delivers the result, and then disappears, leaving your primary workspace uncluttered.
How Claude Decides Which Agent to Use
Claude's main intelligence acts as a dispatcher. When you give it a prompt, it analyzes the request and compares it to the descriptions of your available agents. If it finds a match, it automatically delegates the task. For example, if you have an agent whose prompt begins, "You are a financial analyst specializing in quarterly reports," and you type, "Analyze this Q3 earnings report," Claude will almost certainly hand the job to your specialist agent. Being clear in your agent descriptions is key to effective auto-delegation.
A Deep Dive into Security: Working Safely with a Powerful Tool
Giving an AI access to your file system is incredibly powerful, but it requires caution. By default, Claude Code will ask for your permission before taking any significant action, like writing a file or running a command. For power users who trust their workflow, you can launch Claude with the --dangerously-skip-permissions flag. This removes the training wheels and allows the AI to operate without constantly asking for confirmation.
However, it's crucial to adopt safe practices:
- Principle of Least Privilege: Only work in project folders that contain the files relevant to your task. Don't run the tool from your home directory.
- Review the Plan: Use features like Claude's "planning mode" to see a step-by-step breakdown of what the AI intends to do before it executes.
- Consider Sandboxing: For highly sensitive tasks, advanced users can run terminal tools inside a containerized environment like Docker to completely isolate them from the rest of the file system.
For a comprehensive guide on keeping your data safe, explore strategies for mitigating risks when using terminal-based tools.

Claude Code Agents vs. The Competition
How does this agentic workflow stack up against other terminal tools?
How Do Agents Compare to Gemini CLI's Capabilities?
Google's Gemini CLI is an excellent tool and a great free starting point. It shares the concept of a context file (gemini.md), which is a huge step up from the browser. However, it currently lacks the sophisticated sub-agent delegation system of Claude Code. With Gemini, all tasks are handled within a single, continuous context, which can become bloated over time. Claude's ability to spin up fresh, isolated contexts for sub-tasks is its key differentiator for complex, multi-faceted projects. If you're looking to start your journey with Google's offering, check out Getting Started with Gemini CLI.

What About Open-Source Alternatives?
Tools like Open Code are emerging and show incredible promise. They offer the flexibility to use various models, including local open-source models (like Llama 3), and can even connect to your Claude Pro subscription. While their agentic capabilities are still developing, they represent the future of a more open, model-agnostic ecosystem. The beauty of a file-based workflow is that you are not locked in. If a better tool comes along, you can point it to your existing project folder and pick up right where you left off. This approach allows for a powerful multi-AI strategy, leveraging the strengths of different models and tools together.
Conclusion: Stop Chatting, Start Commanding Your AI
The shift from browser AI to terminal-based agents is more than a change of interface; it's a fundamental change in your relationship with artificial intelligence. You move from being a passive user asking questions to an active commander directing a team of specialized workers. You reclaim ownership of your data, your context, and your creative process. The terminal breaks the AI out of its cage and integrates it directly into your workflow, creating a seamless partnership that amplifies your abilities in ways a browser chat window never could. For a complete understanding of how to harness this power, refer to The Ultimate Guide to AI in the Terminal.
This is your opportunity to build a personalized, automated system tailored perfectly to your needs. It's time to stop chatting with your AI and start building with it. Your true AI superpower isn't in the cloud; it's waiting for you in the command line.
What kind of specialized AI agent would most revolutionize your daily workflow? Share your ideas for a custom AI team member in the comments below!


Comments
We load comments on demand to keep the page fast.